AlphaTricks (Feature Pack)
There are many great fonts in the world, and lots of design companies are digitizing fonts as regular stitch files. The difficulty with these comes in using them: The letters have to be imported one at a time, there is no baseline, the sewing order can be messed up if you copy and paste; sizing and color sorting are issues to be managed too! Plus it would be nice to use the envelopes and text path tools that are used for the built-in keyboard lettering fonts.
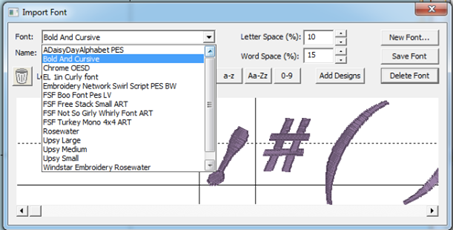
For this reason, we have created the AlphaTricks feature pack! This window is brought up from the Utility menu item, “Import Font…” and it lets you import fonts as well as manage ones you’ve already imported. Let’s take a look at this Import Font dialog box as it contains the mapping shortcuts as well as other useful information and tools. The following numbered picture is shows you the tools and buttons in groups as they will be described below:
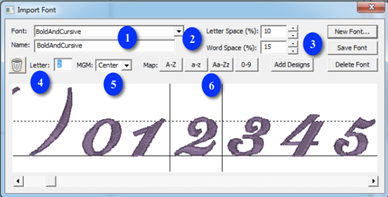
1. This shows you the name of the folder that you have selected. Below this is name of the font as it will be shown in the font list in your program. You may change the font name and this information will be saved with it and displayed in your font list.
2. We have set the default spacing between letters and words which will be perfectly fine for most fonts that you map. If you find that these settings need adjusting, you may do so here and these values will be saved with your font.
3. Here we have the buttons for adding a New font, Saving you mapped font, Deleting a font you have previously mapped and Add Designs to an existing mapped font.
4. The trashcan button allows you to remove the current letter from the mapping process. The Letter: shows you the name of the current design – once it has been mapped, this field will show you the character on the keyboard that corresponds to the currently viewed letter.
5. The MGM pulldown is for mapping monogram alphabets – is the current letter a Left, Center, or Right monogram letter.
6. The Map: buttons are “quick mapping” tools that you can use for fonts that have been named sequentially and are displayed as such in this dialog.
Let’s get started. Click the button ‘New Font…” This brings up the window which allows you to browse and import design files. Since you are importing a whole font, find the folder with the font and click ‘Sel. All’ to select all the designs. If your folder contains designs that are not specifically part of the font itself, you might want to use the ctrl-click to de-select those files.
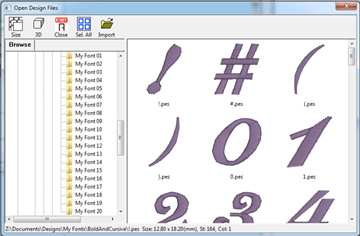
It is important that all the files for the font are together in one folder for easier and complete mapping. If you discover that some files are missing, for instance the “0”-“9” designs, you can open this font at a later time, choose Add Designs and resave your font.
Once you have the designs loaded into the window, you will have to map them to keystrokes. The field marked “Letter:” lets you type a character on your keyboard which will map to the current design. The current design is boxed in by black lines in the view on the right. In the picture at the start of this section, the number ‘2’ is selected.
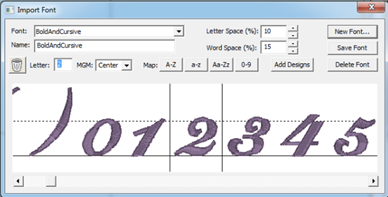
If you have a set of designs where all the letters or numbers line up next to each other, you have some shortcuts provided for you to map the keyboard to the designs. You’ll see the buttons “A-Z”, “a-z” and “0-9.” As an example, click on the design that is the letter “A” to select it. Then click the “A-Z” button. This will automatically map the A-Z letters to those 26 designs.
If your designs are organized in some other order then you will have to manually type those keys to map the font.
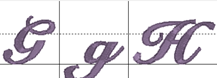
Sometimes individual letters require adjustments for their baseline. In the view, the pictures of each letter are shown, with a black line representing the baseline. You can click on a letter to select it, and once selected, drag the letter up or down as necessary to place it relative to the baseline as you like.
Some things like apostrophes always need adjustment, naturally, but letters with descenders like “g” or “y” will usually need adjustment also.
The spacing of letters between each letter and each word can be set using these boxes. The spacing is always a percentage of the font height.
Use the Font box to select a font that you want to edit. Once the font loads, you can make adjustments to the font, such as remapping letters, adjusting sizes or positions on baseline, etc. When you have the font how you want it, click “Save Font.”
If your font is missing letters that you have now located, use the Add Designs button to open the Import dialog box to select and add the missing letters. You will need to map these new letters and save the font.
Note: Fonts must be named uniquely. If you accidentally name a font the same as an existing on, it will get a (2) added to the name.
Another Note: Long font names may run past the visible space on the font selection in the Letter properties, so we recommend shortening the font names using initials or abbreviations. Do this in the Name line under the Font list box.
Using Imported Fonts
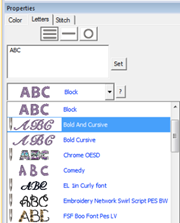
When you create a lettering design, you can now use the font that you’ve imported. Imported fonts are indicated with a needle overlaid on their icon, as seen on the picture to the left. These fonts can do almost everything that the built in fonts can do, such as make monograms, circles and even be shaped. When these letters get sized, the built-in sizing technology will recalculate their stitches.
There are however, no stitch properties for these fonts, as they are stitch-files, not our digitized objects. So removing of hidden stitches, underlay and density cannot be changed, for example.