 There are a number of
preferences for the program and design page that can be adjusted. Click on the
Preferences button to reveal these controls.
There are a number of
preferences for the program and design page that can be adjusted. Click on the
Preferences button to reveal these controls.
In the Preference window, under Environment, you can choose a hoop. Hoops are displayed in a sorted list, organized by embroidery file format. Most embroidery hoops are made using the metric system, so the sizes for the hoops are displayed according to the way the manufacturer sells the hoop. An approximate size in inches is also shown.
There are many hoops that are built into the program, and you can add your own. As the program updates over time, or if you have edited a hoop, you can use the “Defaults” button to restore the program to the hoops provided. The “Default” button will not, however, remove any hoops you’ve added yourself.
Optional by product: Depending on which products are loaded, some multi-position hoops may be listed – they have “Multi” listed after the size. Designs will automatically split upon the Save and a text file will be created with the stitching instructions. See the section on “Multi-position Hoops” for more information.
Many times you will want to sew a design sideways in the hoop. But rather than laying out your design sideways, it might be convenient to have the hoop displayed as rotated. Checking the “Rotate 90” button accomplishes this. You can also double-click the hoop indicator on the status bar to rotate the hoop 90°.
You can create hoops
and edit hoops too. If you use the word, “Round” or “Oval” in the name, your
hoop will be drawn using that shape. When you create a new hoop, it will
become 
the selected hoop. If you have added a hoop, or if you decide to have the program display only the hoops that you own, you can delete hoops from the list, using the “Delete” button.
The width and height fields are self-explanatory, and you can name your hoop as desired. Hoop names should be unique.
Note: Do not create a hoop that is bigger than the sewing field of your embroidery machine.
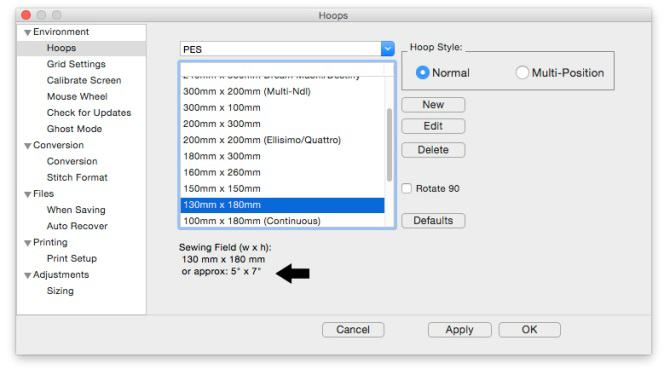
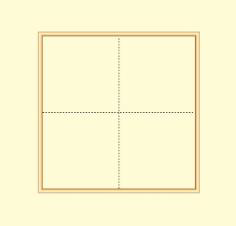
Left: Hoop selection. Right: What a hoop looks like in the Main View.
When you create a new hoop or modify an existing hoop, you are really defining the embroidery field, not the physical dimensions of the hoop. You must know your machine’s embroidery field as you cannot use a hoop that is larger than what your embroidery machine can sew, unless you are creating a multi-position hoop, which we’ll discuss separately in the Multi-Position Hooping section.
Check the status bar at the bottom of the window for hoop information, which displays the selected hoop size whether it is visible or not. Zoom out to find the hoop (if it isn’t hidden by your design).
Note: If your program is licensed to use it, there is one hoop, the .PES Jumbo 14” hoop, is shown in both the Normal and Multi-Position section of the Hoop Preference. Using either selection will create the correct file for use with this hoop, however, the Normal version displays it as a single sewing field, and the Multi-Position version shows both fields in use.
The Main View is calibrated to a real-world scale for precise display of designs. Use the Preferences Window to calibrate your display for real-world size:

Hold a ruler up to your screen and adjust the slider until the measurement in the program matches your real-world ruler. This will help you better estimate real design size while editing designs.
The Mouse Wheel can be used to zoom the Main View. It can also be used to scroll the page up and down. We recommend that you use the setting that allows for zooming as this is more useful to most users.

Designs can be saved into many different formats. The Conversion Preference allows you to adjust some parameters when you save in those different formats.

The file format itself may have inherent limitations on the number of colors or stitches, such as the 16 color limit in .PCS. But there are also machine limitations too. Older machines that use the .PES format had limits of 100 colors, whereas the newer ones can go to 127. To help you save files correctly for your machine, there are options for some formats, such as .PES.
PES Files have to support two distinct machine types, and also have different data for the support of card reader/writers that many .PES machines required. Let’s look at the .PES options more closely.
“Use version 5 and later for real threads.” This setting exists because the version 5 of the Palette/PE-Design software, which invented the .PES file, added support for real thread colors. This was a wonderful addition for this format. However, if you own an earlier version of the software, and you want to use files created in Embrilliance, then you need to leave this set to “Force version 1.” The reason is simple: The old software simply cannot open those version 5 files.
The machine specific settings are for machines like the Ellegante, which takes the 180 x 300 hoop (while other machines may not be able to accept this hoop, so why write a file for it.) Or the multi-needle machines, which have their embroidery field rotated to a landscape position. So a 200x300 or a 300x200 field, while technically the same size, have different rotational parameters.
Certainly you know if you have a multi-needle machine, or require the use of older software to write your card. If not, or if you are distributing these designs, please just leave the settings as-is. The program actually finds a Lowest Common Denominator in the format that it will output, making the file available to the widest range of users.

DST and EXP Files have a different type of information contained in them where it pertains to jump stitches. Rather, those formats have to have some number of “Jump” commands in a row before they will cycle their thread trimmer. When making a DST file, and converting from something else, these jump commands need to be translated. As machines differ in setup for the number of commands needed to cycle the trimmers, we offer this setting in the conversion preferences.
Most embroiderers have one machine or other that they use most for embroidery and that machine has a format that it uses. To save time, the format that you choose here will automatically be selected during the save.

Note: Even though you have set a preferred format, you can still choose File > Save Stitch File As if you need to occasionally save in a different format. After selecting a new format in the ‘Save As’ dialog box that format will “stick,” over riding the Preferred Stitch Format until you either reselect the preferred one or a new one.
Note about SHV: Setting the preferred format to SHV does not create the file structure your machine may expect to see. To create a proper Designer 1 diskette or stick, please read the section on Creating A Designer 1 Disk or USB Stick.
Auto recover will save your file in a separate space every so often. This is adjusted using the slider. This feature is useful when working on a complex arrangement where a power outage or program crash (unlikely) or freeze by the operating system (it happens) could force the program to quit and you might lose your work. If you are working while power-outs are happening, well, turn this on. And don’t run your embroidery machine; brown outs are not good for them.
The program can check for updates if it is running on a system connected to the internet. This will occur once each day, the first time that you run the program. The program does not send your information or anything about you or your computer to us. It merely checks the current version available online for your program and if there’s an update, it lets you know. If you don’t want this, you can turn this off.
You can also check for updates at any time from the option in the Help menu.