Several Embrilliance products make use of the feature sets in this section. These features are not universal in the platform, but may appear in various products such as Essentials, Enthusiast and StitchArtist. The specifics are noted with each feature. For current feature information you can also refer to the Embrilliance website.
Applique (Essentials, StitchArtist)
When you select a color by clicking on it in the Properties window, you will see the color window appear. This has two tabs, the first of which is to change the color, as discussed in the prior section.
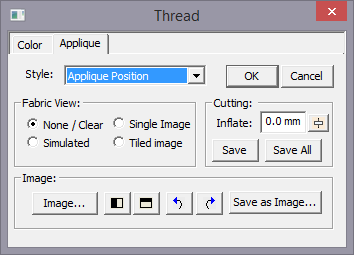
The second tab is used to set applique states on the selected colors. This information is used by the program when removing overlaps, and adds other features such as saving a file for use in applique cutting machines.
Essentials includes the ability to have the Simulated Fabric View.
The StitchArtist version of this window is shown, which includes the use of images.
When a color is assigned as ‘Applique Position’ or ‘Applique Material’ then that color becomes exempt from having its stitches removed. They are likely to be hidden, but they are necessary when sewing the applique design.
Colors can be assigned as applique position or material in three ways:
1. Use the drop list on the Applique tab of the Color Window.
2. Right click on the color ship in the Property window and use the context menu.
3. Name the object in the Object Tree as Applique Material or Applique Position. The words can be abbreviated: “Appliq Mat” or “Appliq Pos” are acceptable
The ‘Material’ layer is used strictly to prevent the removal of stitches – first in the sense that the material stitches themselves are not removed, but additionally that the fabric inside the applique can obscure earlier stitches. As it is not good to have bulky stitches underneath an applique, those are removed. By way of example, you might want to overlap two or more appliques, and where they overlap, you want the minimum stitches necessary. Note that some designs do not have a separate material tack-down color. That’s okay to leave off in most cases.
The ‘Position’ setting is always to be found in applique designs – otherwise they would not be applique. The position of the fabric is sewn down, and then the applique is applied.
Using this information we can do some additional things in the software:
Generate a fabric simulation: The fabric is simulated using the chosen color of the object. You can change this setting, and the color itself ‘live’ in the window to preview the results. When you find a suitable setting, you can click ‘OK’.

If you have StitchArtist, you can do more, as described in the section, Photo Applique.
The type of stitching is important for the operation of the applique discovery process in the software. Generally, applique position steps are made from single running stitches, which may jump to other sections and/or holes. Most digitizers will do this simple run, and then add tie-off stitches at the beginning and end of each outline. Sometimes the outlines will not close perfectly, but the software overcomes this, as well as the tie-offs. But if the digitizer uses some other stitch, it is possible that the process will not be recognized as an applique when you want it to. The easy way to check is to turn on the fabric simulation. If that looks correct, you are good to go.
Also note that the program is not converting filled sections into appliques. That must be done by the digitizer who created the design. This applique discovery process is to make using existing applique designs easier and more fun.
The Program Preferences have a setting under “Files->When Saving” that can be used to turn on/off the use of applique in the removal of hidden stitches.
Also the use of the Program Preferences under “Printing” can allow selected colors to be printed. This can be useful for machines that scan in a printed output for the purpose of cutting, such as the Scan ‘N Cut.
The software analyzes the shapes created by the Position stitches and then creates a simpler output for the cutters, and saves it to their file. .fcm for Brother Scan ‘n Cut and the .studio Silhouette products, along with .svg and .plt files can be saved. Nearly every cutter can make use of one or more of these formats.
Save the cut file and send it to your machine according to the manufacturer’s instructions.
The ‘Save All’ button will merge all the Position stitches on the design page, whether or not those objects are selected, and the resulting cut file will have all applique elements in it.
Generally speaking, applique steps are;
1. Set the colors as needed.
2. Save the cut file.
3. Save the design file (working and stitch)
4. Cut the applique.
5. Embroider the design.
Alternately, you can still use the image in a print process, and pre-cut the applique by hand. There are a lot of options!
1. Use an
image such as a photograph or fabric swatch inside the applique shape.
2. Create a print that is cropped to the outline, making it easy to hand-cut pre-cut appliques.

3. Print the cropped image on printable fabric or transfer paper for the effect of combined photography and embroidery.

4. Inflate the shape of the outline. When digitizers create a design that will be hand-cut in the hoop, they know that the embroiderer won’t cut exactly at the line of stitching. So when they make the ‘Material’ run, they often simply duplicate the ‘Position’ run – same size, etc. This creates an issue for Pre-Cut Applique as the ‘Material’ stitching will not catch the applique – it is exactly the same size. Using the ‘Inflate’ when saving for cutting machines will create an applique that slightly hides the ‘Position’ and can be held in place by the ‘Material’ stitching.
5. The ‘Position’ is usually a simple enough set of stitches to be processed into output for an automatic cutting machine. These machines will take a file and use that to cut the fabric. Having cut the applique beforehand makes the embroidery process much more rewarding.
The management of threads is a challenge for every embroiderer. And every embroiderer handles this differently. Some people are very organized and will colorize designs with only colors they actually own. Others resist changing threads at all. And of course commercial embroiderers ignore colors onscreen entirely and just run whatever colors the job calls for.
The Thread / Palette Editor provides a place for you to manage which threads you own, create smaller palettes for specific projects, and even share those palettes with others.
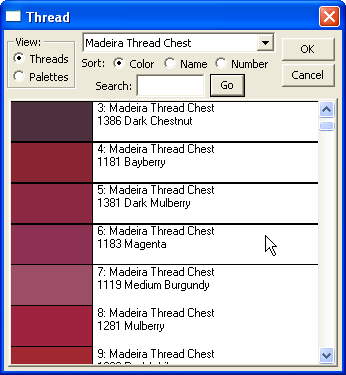
When choosing colors in the main program window, you are given the choice of picking colors from thread lines or palettes. The reason for this is to allow quick access to a current set of project colors, rather than taking the time to scroll through a long list of threads and their complete color lists. Often, an embroiderer is working with a set of colors repeatedly and selecting through a long list when you, “Just want that blue I’m using,” would be tedious. For this reason, there is a checkbox that is used to determine whether the color list is shown as a thread or a palette.

Note: For the purposes of discussion, the term “thread line” and “palette” are considered synonymous, except when discussing the above checkbox.
The program ships with data for many thread lines, including some that may not be available to you in your area. If you would prefer not to have those threads show up in your list (while changing colors in a design), you can check the box labeled, “Do not display.” This does not hide the thread in the Thread Editor, only in the Thread and Color properties when working with designs and objects.
The ‘Notes’ box can be used to enter any useful information about a particular palette. For instance, you might create a palette of colors for a particular job or project and you can enter information such as “The blue design matches the print on the front of the shirt.”
Each thread brand or palette is stored as a file on your computer. As such, the toolbar has options for you to create new thread palettes, save a palette which you’re working on, and even delete a palette that’s no longer needed. These actions are performed by the left three buttons on the toolbar.
Merging Color Palettes
The next button, ‘Merge’ will open a thread window that lets you select one or multiple colors to be merged into the current palette. Also, there is a Delete button which removes any selected threads from the current palette.
Multiple selections can
be made using the Ctrl and Shift keys while selecting with the
mouse.
When merging colors from another thread or palette, the ‘brand’ for those colors will take the name of the current thread. This is one difference between a thread and a palette. If you merge colors into a palette (the palette box is checked) then the colors will keep their original thread names.
If you would like to share or import a palette, use the two buttons on the right of the toolbar. Sharing a palette is great when you are making a project that others will make too.
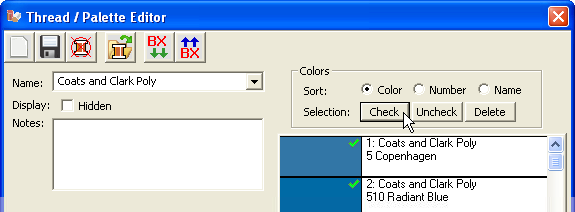
You can mark threads that you have in your personal inventory using the ‘Check’ and ‘Uncheck’ buttons:
Creating colors (Essentials+Enthusiast, StitchArtist)
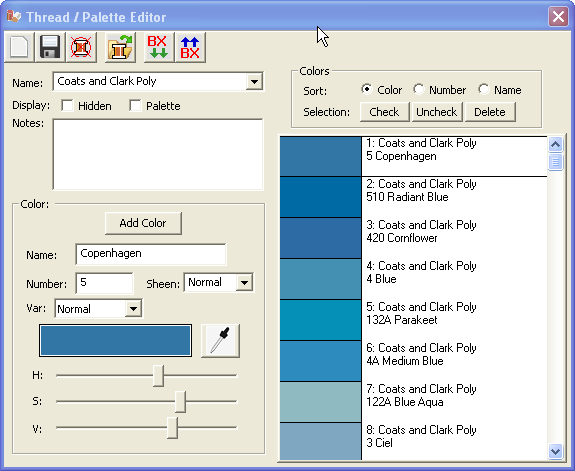
These products add the ability to create your own colors and add them to thread lines and palettes. To create a new thread or palette, click the ‘New’ button on the toolbar.
Click the ‘Add Color’ button to create a new color entry in the current thread / palette. Type in its name and thread number, if those exist, then adjust the color itself.
Using the ‘Sheen’ setting, you can alter how the thread will display when 3D rendering is turned on in the main display. You can also input up to four variegated colors on a thread. Using the ‘Var’ drop-list (short for variegated) you select the number of colors used. There will appear a set of buttons ‘V1’-‘V4’ each of which allows you to select and set the color for that particular variegation.
The color grabber tool will let you click in any window and pick up whatever color is under the cursor. This is very useful when you are building a thread palette from a document such as a .pdf or a thread manufacturer’s webpage. If you want to adjust the color visually, use the HSV (Hue, Saturation, Value) sliders until you get a color that you like.
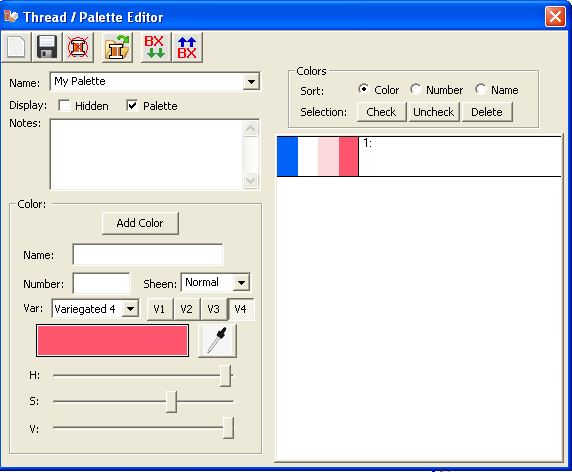
Left: A typical thread list. Right: A variegated color in a user palette.
Multi-Position Hooping (Essentials, Enthusiast)
So, you saw it on the Internet and had to have it.
But it’s too big for your machine…
Essentials and Enthusiast have our patented design splitting technology built into it. This system automatically splits designs into multiple positions for sewing as separate designs which tile together to make a larger design. In the past, splitting a design took hours of editing by a person schooled in the process.
Our splitting drastically reduces the visible ‘seams’ that occur from manually splitting files using an editor. In most cases, the final product is indistinguishable from one created on a larger-field machine.
Note: StitchArtist has multi-position hoops for the sole purpose of digitizing to accommodate them. You can digitize the design as a whole, and then separate designs and add alignment lines as needed. StitchArtist does not include auto-splitting of designs.
Some hoops have multiple positions. This means that you only hoop the fabric once and generate the design by sewing it in those multiple sections. However, you can achieve the same result by re-hooping the fabric multiple times to create the design. We call this a “Virtual Hoop.” The Essentials version of the program comes with many hoops and virtual hoops pre-defined. The Enthusiast version has creation and editing of these hoops as well.
When sewing designs in multiple sections, often the question of alignment comes up. This is accomplished automatically with multi-position hoops, but to make it easier for regular hoops, the program will add basting stitches which will align the designs. To choose a hoop, click the preferences button on the toolbar, and the Hoops window will appear:
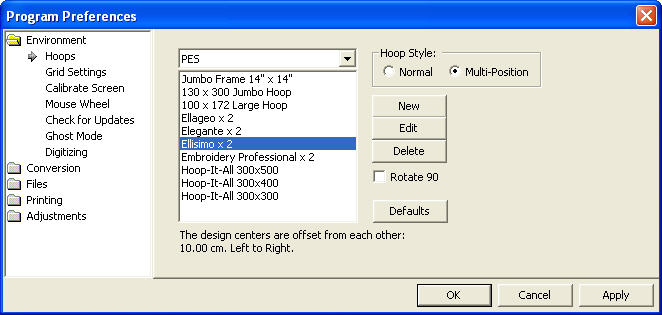
The Multi-Position hoops are separated from the Normal hoops, and you click on the Hoop Style to select which list you want to see. Here is the Jumbo Frame:
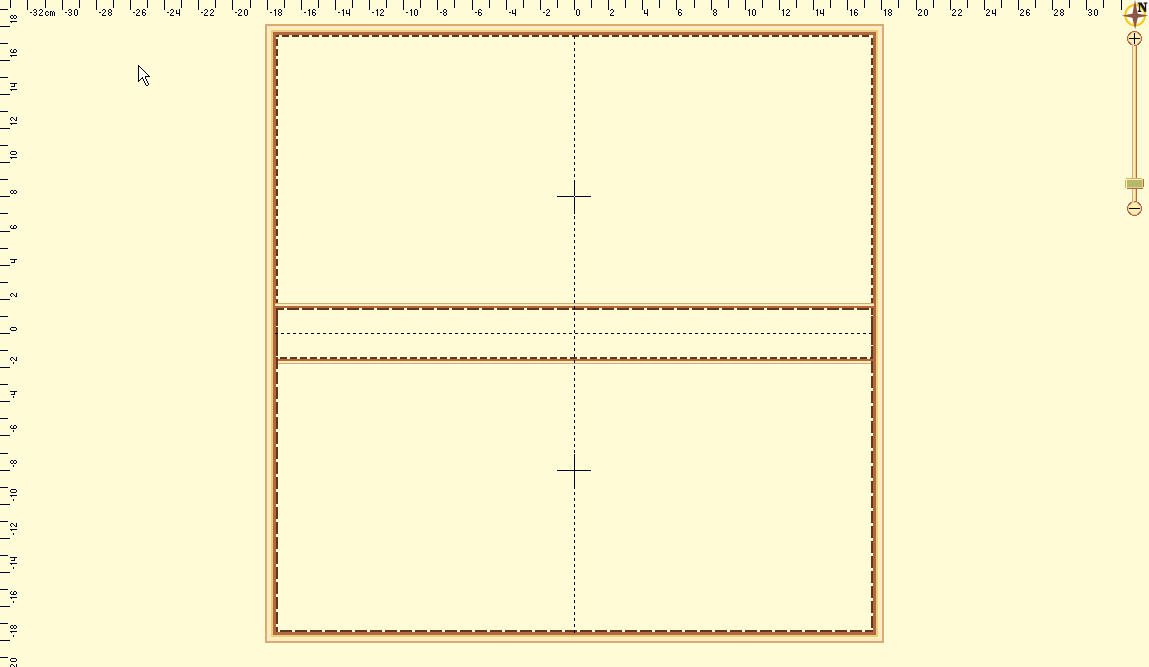
You’ll notice that this hoop has two rectangles, which overlap in the middle. Each of these represents a sewing field. To make it more obvious which lines represent which field, the inside of each rectangle has a dotted line indicating the inside of the field.
If you are combining designs to make a composition, it is always going to give the best result if you keep whole designs into one region. This produces a split which will have the least effect on the actual stitches on the design. Of course, this is not necessary, however, as the design may be split even if it lies in the middle of the hoop, but some splitting would have to occur.
The ‘+’ marks shown indicate the centers of the sewing fields.
Note: If you look at the Hoop in the selection window you will see a note that the design centers are offset from each other. This means that when you sew the two sections, the centers of each design will be separated by that amount. This is your initial placement method for each design.

In order to position your design, it is always advisable to print an actual template of the design. This helps you visualize what it will look like once embroidered, and it will help define the center position of the design on the fabric. Once you have the center of the overall design, then you will want to mark the centers for the individual fields. In the example above, this would mean that you mark the fabric 5 cm. from the center on both the left and right of the design center. This places the two designs 10 cm. apart. This basic positioning will help you get the result onto the fabric where you want it to go.
Multiple Hooping is the process of creating a large embroidery design by re-hooping the fabric as you embroider each section. Multiple Hooping is an art that requires a complete understanding of what you are doing, as well as an excellent ability for placing your fabric in the hoop. It is not a method that should be practiced by the timid. You can split designs for Multiple Hooping by creating your own hoop:
Suppose you have a design that is 9 inches high and 8 inches wide. Also, suppose that your machine will embroider a region 9 inches high and 6 inches wide. (These are typical values for today’s machines.) What you want to do is to create a two-position hoop to accomplish the split.
Therefore, create a hoop that is 9 inches high, with two positions. The separation should be set to allow the greatest possible overlap between the two regions: 8 inches (desired) - 6 inches (a single hoop width) = 2 inches.
A separation of 2” would be the smallest possible for the desired 8-inch width, and would provide the greatest overlap of the regions.
Note: The use of columns allows side-by-side multiple-position hoops. It’s a lot of embroidering, but it looks good and can easily fill a jacket back.
It is very important to mark your fabric before embroidering. When the fabric is re-hooped it must be parallel and centered to the first hooping. Also, the distance between the centers needs to be precise. (This is 2 inches in this example.)
If it is possible, we encourage the use of ‘Floating’ techniques for hooping: not actually hooping the material itself, but rather hooping a stabilizer and attaching the fabric to it with adhesive and/or a basting stitch. This will provide the least distortion in the fabric while the overlapped regions of the design are being embroidered. One easy method, if your material can handle it, is to use carpet tape (double-sided and very sticky) on the bottom of your tightened hoop. This can then be perfectly aligned and pressed into place. (The adhesive comes off with a lot of water-soluble solvents and even soapy water will usually work.)
Remember:
It is a really good idea to take a class on this type of process to get the hang of it, and practice before moving on to an actual project!
When you save your files, the output files represent each region of your design.
The files are automatically given names indicating their stitching order as well as the position within the hoop. For instance, “Rose.Pes” may split into “Rose Top #1.Pes” and “Rose Bottom #2.Pes”.
Additionally, you may get a text file that explains the color sequence for your new files. In many designs, a color is only needed in one region. Where this is the case, that color will not exist in all the output files. To help reduce this “Color Confusion”, a text file is created with a table. The following is text from an example file:
“Roses.Pes
Your original file had 3 colors.
The program has split your file into 2 segments.
This cross-reference has been created for you because some thread colors in the original file were not needed in some of the split segments.
File: C:\Roses Top #1.PES
Color 1 = original color 1
Color 2 = original color 2
Color 3 = original color 3
Color 4 = original color 4
Color 5 = original color 5
File: C:\Roses Bottom #2.PES
Color 1 = original color 1
Color 2 = original color 2
Color 3 = original color 3
Happy Embroidering!”
As you can see, the table is easy to follow. Since this is a text file, you can view it in Designer’s Gallery Studio. You can also edit it (double-click to launch Notepad), print it, etc. It is a good idea to add any real thread numbers or names if you have them. Often, the digitizer of a design will supply a real-color thread list for this purpose.
We cannot stress enough the fact that the order of embroidering the files is important.
The files will overlap each other as they sew. If you embroider out-of-order you will get overlapping that is incorrect, and parts of your design will not be visible!
On hoops that have three positions, the regions are named for you: Top, Center and Bottom. On hoops that have more positions, the other positions are given numbers, starting at the top. Hence, you might have a hoop with: Top, Pos. 2, Center, Pos. 4 and Bottom. Columns have names like “Left”, “Right” or “C2”.
To get the best results, there are some things you should know.
First is that you should trim your jump stitches as you go, if your machine does not do it automatically. This is true in the course of normal embroidery, but somewhat necessary when embroidering a split design. When splitting a design, it is natural that the machine will have to go from place to place a little more frequently. This results in extra jump stitches. We have made every effort to minimize the amount of effort that it takes to split embroidery files, and apologize for any inconvenience this may cause, but please accept our assurance that your finished product will have a nicer appearance if you clean the jumps from the design.
If you are using an appliqué design, you will need to embroider each color in each region before moving on to the next color. This will ensure that the full appliqué can be applied without incorrect oversewing by the other colors.
There is a compensation control in the Hoop Properties window. This control is available on all hoops, even the factory-defined ones. Compensation is the amount that each region will overlap the neighboring regions. This is used to correct for the fact that fabric will shrink as it is embroidered. Additionally, an imperfectly hooped project will allow registration problems to occur. If you are not able to hoop your fabric, ‘Drum-tight’, then you may want to increase the compensation setting for your hoop.
Important: If you are increasing the size of a design, please don’t increase the size more than you will actually need for your hoop.
Note: There is a very important phrase in the computer industry: “Garbage in, garbage out.
When you click the “New” or “Edit” button in the Hoops Available window, you will see this screen:

EXPLANATION OF FIELDS:
• The first field in this window is the ‘Hoop Name’. This is just what it sounds like. Type in whatever name you want.
• Next, choose the ‘File Type’ of the machine that this hoop works on. The list contains the file types that can be saved.
• The ‘Individual Field Size’ is the size (in mm) that your embroidery machine can create with a single hoop position. If you are unsure about this size, consult your dealer.
• The ‘Rows’ field specifies the number of vertical points at which the hoop can be attached to your machine. For most multi-position hoops, this number is three. For sliding hoops such as those made by Hoop-It-All, you will have to determine how many sections you want to embroider in. In so doing, however, keep in mind that there should be a good overlap between adjoining sections. Use the hoops we’ve provided as examples.
• The ‘Columns’ field specifies the number of points at which the hoop can be attached to your machine sideways. For most hoops, this number is one, but there are exceptions on the market. These are usually described as “Double-Wide”. You can also use the columns to indicate that you want to divide the design into horizontally-tiled segments.
• The ‘Separation’ fields specify the distance between the hoop positions. (For example, the distance from needle-center of the top position to the needle-center of the middle position.) This can be measured physically if you do not know: hoop a piece of paper and drop the needle through it, in all hoop positions, measuring the distance between the holes. Alternately, most manufacturers’ software will show a grid behind the hoop on the screen. You can count the grids (usually 1 grid = 10mm) between the region marks to get the separation. It is very important that you correctly assign the separation; otherwise the design will not be split accurately.
• The ‘Right-to-Left’ field is used for multi-column hoops (‘Double-Wide’). It indicates that the initial direction the program will split the design will be right-to-left, as opposed to the standard, left-to-right. The use of this depends on the machine and hoop. Some manufacturers have wide hoops that start by sewing the left side of the design upside-down, then you turn the hoop halfway around and embroider the other side (now the right side, and the design is right-side-up). Hence, the default, ‘Left-to-Right.
NOTE: You can tell if your separation figure is correct! The manufacturer of the hoop will definitely provide you with the number of positions used as well as the full size of the embroidering region of the hoop. As you adjust the separation, the field, “Overall Size” is calculated. If this matches the figure given to you by the manufacturer, you have correctly set your separation.
• ‘Compensation’ allows the final regions to be slightly increased in size. This forces the regions to overlap each other. This is useful because as the machine adds stitches, the fabric gathers slightly. It is entirely possible to have a gap between regions if no compensation were to be used. The amount of compensation required depends on several factors: The size of the hoop, the fabric being embroidered, the number of stitches, the quality of the stabilization, etc. We have chosen some settings for our factory hoops that have worked well in our design testing. Please embroider some test designs with the desired hoop before tackling a project. This will ensure that you have a reasonable setting for your compensation.
• ‘Color-by-Color’ denotes a different type of file splitting. As of this writing, only the Viking Mega Hoop™ allows for this type of design splitting, so as a general rule, never check this box. The Color-by-Color method is for use in machines that can sew each color in all of the hoop regions before going on to the next color. When the machine operates this way, it will stitch in its current region until it no longer can. It will then stop and ask the user to reposition the hoop, whereupon it will continue stitching. In the case of most designs, this will cause a lot of position switching as a color typically stitches objects out in a random fashion all over the design. The program will ‘sort’ the stitch objects to reduce the number of position-switches required.
• ‘Invert Alternate Column’ is used for ‘Double-Wide’ hoops that get turned upside-down for their second row.
• ‘Add basting alignment lines’ will provide a basted line of stitching to each output file. These lines of stitching will have their end and/or center points line up on the fabric when you go to stitch out the designs. If the lines do not line up, then adjust your hoop/fabric position until they do.
• ‘Baste Length’ sets the size of the alignment line stitching, in mm.
Once you have finished creating or editing your hoop, simply click, ‘Save’ to save it.
If it is a new hoop, it will then appear in the Hoop Available window.
You can split the design using the “Split Into Hoop” from the Utility menu. This will open a new design page with the split files so that you can preview them or do other work before saving.
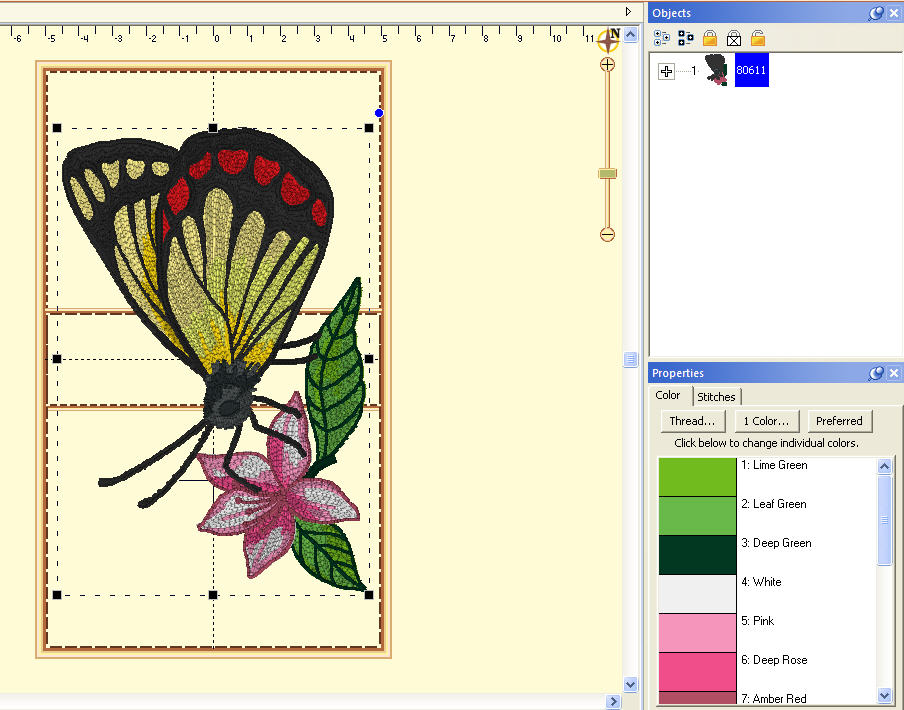
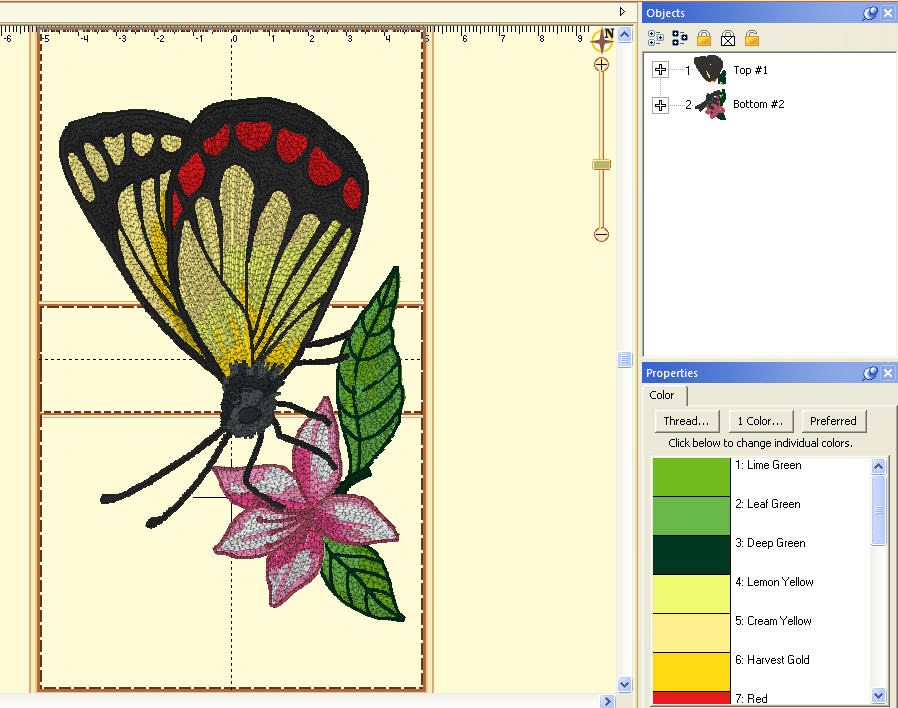
Left: A single design placed on a 100x172 hoop. Right: The design has been split.
In the example above, the 100 x 172 PES hoop was chosen, and the design was centered in it. Then the menu item, Utility->Split Into Hoop was chosen. This created a new design page, represented by a new tab. In that page there are two designs, one for the top hoop section, and one for the bottom. Using ghost mode, we show the designs separately:
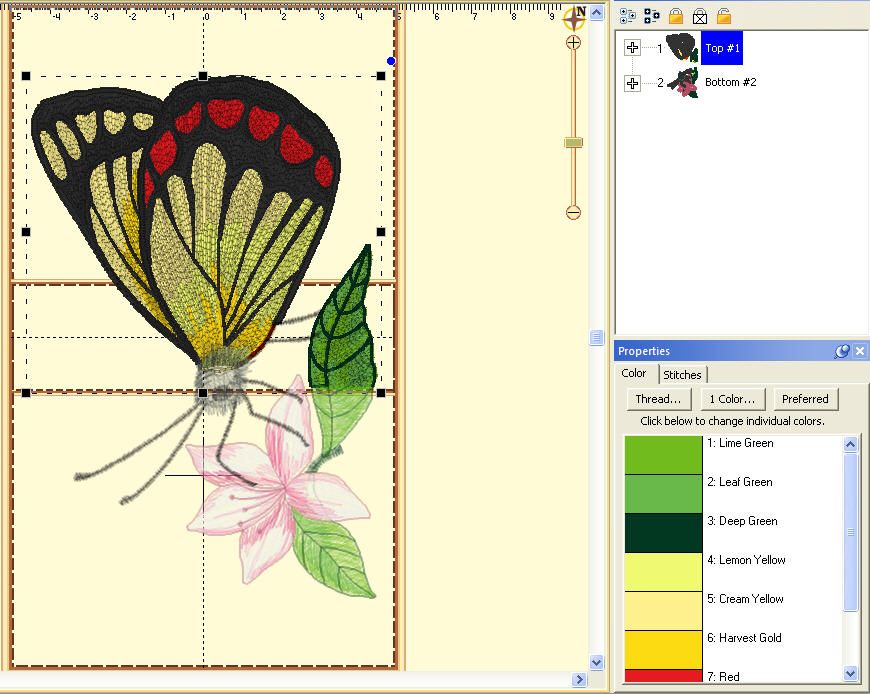
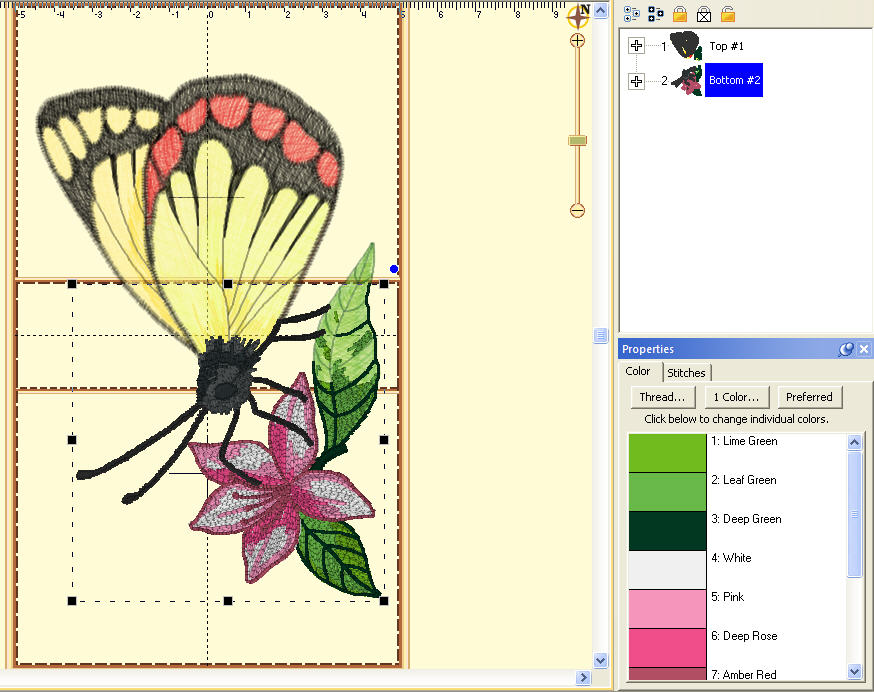
Left: The top design is selected. Right: The bottom design is selected.
When you save this page, multiple stitch files will be created, as described in the next section, “Output Files.”
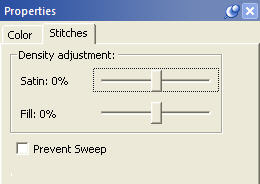
The stitch properties tab appears when a stitch design is selected. There are controls where you can add or remove up to 25% of the stitches by increasing or decreasing the density of the selected items. The slider controls will separately allow the adjustment of satin stitching and fill stitching, which allows very specific control.
If you are a DRK user, there are additional controls which also tie in to the Project Advisor and the Project system.