The idea behind Essentials is to include the features, which are essential for every embroiderer, yet not to overwhelm the user with unnecessary extras. It is designed to be simple and easy, yet powerful enough to accommodate the person who wants to do more than simply using existing designs. The feature packs are additional programs that you may purchase to add on to your Embrilliance Essentials to make it YOUR software. No need to learn a new program! You simply add new features and functions as you want them to your existing software.
• 12 Fonts for multi-line text, monogramming and circle text.
• Sample designs, which are scalable and recalculate their stitches as you interactively transform them.
• Unlimited lines of letters or monograms and embroidery designs can be combined.
• You can mix and match fonts and sizes.
• Merge existing embroidery files into your design.
• Overlap designs – even appliques – and have hidden stitching removed.
• Browse and Merge designs in folders and from inside .ZIP files.
• Resize existing embroidery files with stitch recalculation. You can resize embroidery designs up to 250% and down to 50%.
• Colorize any embroidery design. You can change the colors one at a time, or convert the entire design or any selected part of it to your preferred thread brand with just a few mouse clicks.
• Simulate the sewing of any design. The simulator can play in 3D, play forward and backward, and has variable speed. The simulator also has a slider so that you can manually scroll forward and backward through the design to any point without waiting. You can even insert a color stop in the sewing process.
• Convert any design from one format to any of the supported types, which include:
• Read: ART, CND, CSD, DST, DSZ, EMD, EXP, EXP+, GNC, HUS, JAN, JEF, JEF+, PCM, PCS, PEC, PES, PHC, SEW, SHV, TAP, VIP, VP3, XXX, EMB.
• Write: CSD, DST, DSZ, EXP, EXP+, HUS, JEF, PCS, PES (v1-9), PCM, SEW, SHV, TAP, VIP, VP3, XXX.
• Designer 1 Disk Utility for floppy and USB machines.
• Split designs for several multi-position hoops, including the Brother/Baby Lock 100x100 machines, and the 14” x 14” Jumbo Hoop.
• Project Advisor, a patented expert system with guidance to help successful embroidery on all your projects.
• Install .BX files, the industry standard for distributing fonts in a ready-to-type format.
• Create a working file (.BE extension) to save your design as an editable and merge-able file. Your working file is saved for you automatically when you save a stitch file so you don’t have to ‘Save’ twice every time you make some changes—once for the stitch file and once for the working file.
• Embrilliance has an advanced program interface that’s super easy to use yet offers features normally reserved for very expensive programs.
• Real Scale zooming allows you to view your designs on screen at the actual size that they will stitch out.
• Navigation Window that provides instant control over the zoom and scroll in the program’s view.
• Sewing Order control allows you to re-sequence the designs to sew in the order you want them to sew.
• Color Sorting control to intelligently reduce the number of extra color changes.
• Adjustable Mouse Wheel attribute for Zoom or Scroll.
• Simple centering in the hoop plus advanced alignment.
• Thread Palette creation and thread inventory system.
• Basting designs.
• Automatically check for updates.
Essentials has a technology known as a stitch processor which lets you resize existing stitch files from upward to 250% to downward of 50%.
This recalculation of the stitches allows even lettering designs that have been added with a BX font or AlphaTricks to be scaled and stitches recalculated.
When sizing using handles in the Main View, stitches are recalculated – if you hold down the Ctrl key while dragging, recalculation is disabled for that drag (which can be useful to very simply lighten the density in a design a bit).
The process of recalculation is to add more ‘lines’ of stitching in the satin and fill areas of a design. They may even be curved fill lines, or lines with carved areas such as pattern fills. The sizing engine will preserve the look of the fill while keeping the density the same as it was when the design was at its original size.
You can size, resize and resize again in Essentials, as the original design is kept behind the scenes and is always re-referenced when creating a new size.
When sizing with the handles in the Main View, the upper and lower limits of percentage are limited to help prevent overly-distorted designs. You may override this using the size boxes on the Tool Pane which let you type in a size.
When you resize a regular stitch file, the density would normally get more or less dense, but Embrilliance will recalculate the stitches for you automatically.
That recalculation process is complex and difficult, so there are some settings you can adjust to achieve optimal results.
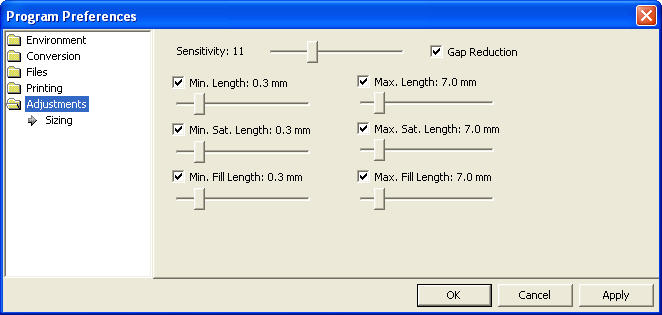
Use the Preferences button on the main toolbar to adjust the sizing settings.
The sensitivity control is used to control how well the program discovers fills and satin stitches. If you have a design which has a lot of manually created stitch effects, then you may want the sensitivity higher, whereas normal designs that are digitized with objects like fills probably don’t need so much sensitivity, especially if there is blending going on.
• Gap Reduction is a function within the software that helps adjacent areas lessen gaps that might be exposed or widen during increases in size.
• The stitch length filters are used to prevent loopy stitches on the fabric from stitch elongation, and in the other direction, small stitches from gathering on the fabric making too many perforations or simply bunching up the fabric.
The settings are broken out by stitch type because the handling of satin stitches is special and you may want to achieve a split-satin look at a certain size.
The “Happy Birthday” design has 6 unique colors but 13 color stops. To make it more efficient for sewing, you might like to optimize the sewing order to reduce extra color changes.
Because letters added together are considered one object, you can’t selectively rearrange them in the object tree. Fortunately, there is easier method accomplished via Color Sort, which can be accessed on the toolbar just to the right of the Undo and Redo buttons.
Use the ‘Color Sort’ choice on the Utility menu, which displays the following dialog window:
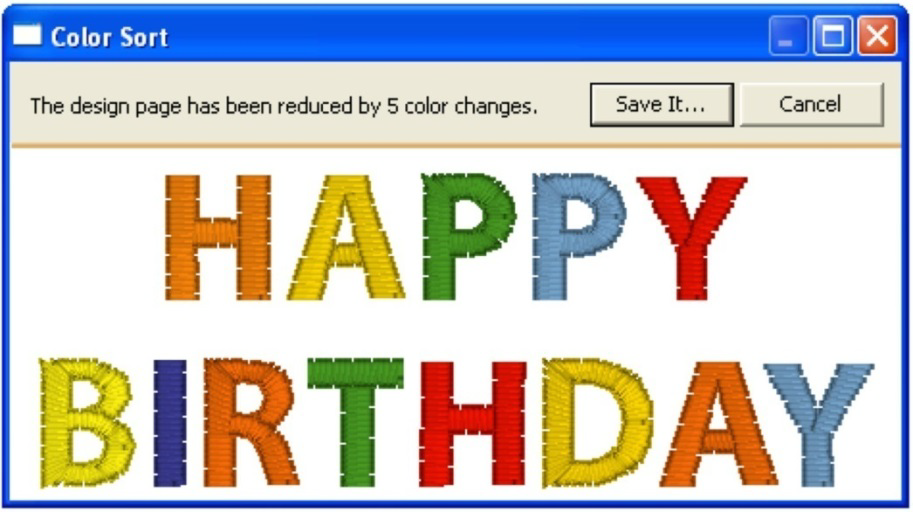
Notice our design has been reduced by 5 colors.
Click ‘Save It…’ to save the color sorted file as a stitch file. If you don’t change the name, the program will append “_sorted” to the end of the current file name. Your original working file (.BE file) is preserved and not changed.
Color sorting can be useful in designs like this or designs that have poor sequencing. Color sorting in this program is intelligent, meaning it doesn’t indiscriminately combine all like colors together. It looks for layering and knows that some colors simply must be repeated.
Note: Do use caution when color sorting. Some designers have intentionally added extra color changes either for design flexibility or to optimize registration. For this reason, always save the Color Sort with a different name (or save the .BE file) just in case you want to go back to the original!
 Design elements can be scaled up to the design
page by selecting them and clicking the Fit Hoop tool. This will recalculate
stitches wherever possible. There are limits, though, such as with regular
embroidery designs, which can only be sized up to 250%. This button will scale
your design as large as it can go, up to the built-in limits.
Design elements can be scaled up to the design
page by selecting them and clicking the Fit Hoop tool. This will recalculate
stitches wherever possible. There are limits, though, such as with regular
embroidery designs, which can only be sized up to 250%. This button will scale
your design as large as it can go, up to the built-in limits.
When designs are overlapped, there may be stitches that are hidden, which you would like to have removed. This process is automatically done when you save a file (controllable by preferences) but you may want to preview the results before saving. The Remove Hidden Stitches will run the process on those stitches so that you can evaluate the result. The result is temporary, however, so if you change anything on the design page, the stitches will return. This happens because changing a design will almost always regenerate its stitches.
For applique designs, you can use the applique tab on the color properties to tell the program that certain colors are applique steps. The position and material steps will not have their stitches removed, as it is considered likely that you will need those stitches. However, the applique material would naturally cover over other stitches, and the material fill is used in the removal of earlier stitching. This is controlled by the Preference “When Saving.”
 The Project Advisor is a patented expert
system, a form of artificial intelligence, which helps you select stabilizer,
needles and hooping techniques for many common projects.
The Project Advisor is a patented expert
system, a form of artificial intelligence, which helps you select stabilizer,
needles and hooping techniques for many common projects.
The system also provides instructions, helpful how-to advice and some words of caution when necessary. First, you select a project from the list. If your exact project or fabric is not listed, there are enough choices available where you can choose something very similar. Next, you can tell the Advisor if your fabric has more or less stretch, and you can adjust thickness. The Advisor takes your input in account as it makes its recommendations, which are displayed as text in the window.
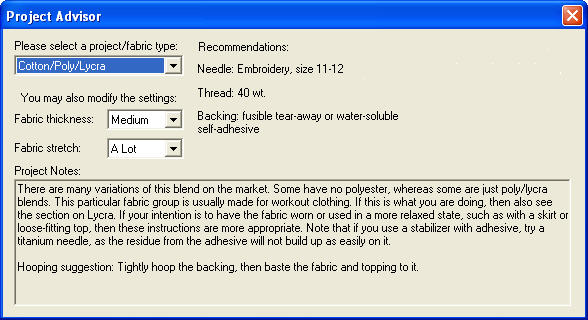
Both the backing (under the fabric) and topping (on top of the fabric) stabilizers are recommended.
 If
you have a Husqvarna Viking Designer machine that uses either a USB stitch or a
3.5” diskette, you can create the proper files and file structure via Utility
-> Designer 1 Disk Utility.
If
you have a Husqvarna Viking Designer machine that uses either a USB stitch or a
3.5” diskette, you can create the proper files and file structure via Utility
-> Designer 1 Disk Utility.
When the Designer 1 Disk Utility window opens, you can choose whether you want to write to a diskette or a stick. Next, choose which menu you on which you want to store the designs. Designs are imported to only one menu at a time.

Note: If you want to add files to a previously created Designer diskette or stick, you will need to first read in the designs and then add the new files to one of the menus. When a Designer disk or stick is written, it replaces any matching file and folder names.
Click the ‘Get Design…’ button and navigate to the desired designs. You’ll see the now familiar ‘Get Designs’ window where you can select individual designs or the entire folder to import.
Note: Each menu can store up to 36 designs. If you select more than that to import, only the first 36 will be imported.

The designs are imported with their original file names and file types at this point. To finish the process, click the ‘Write’ button. Navigate to the desired destination and click ‘Select Diskette.’
Similarly, Designer diskettes and sticks can be read into Embrilliance by clicking the ‘Read’ button.

When you view the newly created Designer 1 media, you’ll see the files are renamed appropriately and all the necessary support structure is also created.
Tip: You are not required to write to an actual diskette. If you create folders ahead of time, you can actually “write the diskette” into a folder on your hard drive for copying onto a diskette later.
Basting Around a Design
 Individually selected designs can have a
basting stitch added automatically. This is useful when you want to add a layer
of stabilizer or some other material before the sewing of a design. The baste is
always placed intelligently so that it runs immediately before the selected
element(s), as shown in the screen shots below.
Individually selected designs can have a
basting stitch added automatically. This is useful when you want to add a layer
of stabilizer or some other material before the sewing of a design. The baste is
always placed intelligently so that it runs immediately before the selected
element(s), as shown in the screen shots below.

All elements were selected (Ctrl-A) before applying baste.

Various elements selected individually and together before
applying baste.
Notice where the baste stitches are placed in the Objects
View.

Here an initial baste is applied and then various areas.
Basting stitches can also be used to secure a layer of topping stabilizer in place before any designs are sewn. A typical use of this is to add a layer of water-soluble topping to a towel, which keeps the stitches from becoming embedded in the terry cloth loops during sewing. It can be hard to hoop a towel, and the topping stabilizer will want to slide around before the stitching happens, so basting it first can make the process easier.
The basting stitches are added to the start of the design or file, and are added as a separate color; naturally you can use any color you want to sew the basting stitches.